
Remote Peloton Bike Fitting: My Review
For months I’d been reading Facebook posts about people getting a remote Peloton bike fitting. Most of the people doing these bike fit sessions were in the Power Zone Pack. They wanted to make sure they were in the best position possible on their Peloton for their power zone training and other classes.
At $149.99 for a remote bike fitting, I wasn’t sure I could justify the cost. But lately, after riding my Peloton, my left hip had been hurting me. Plus, my left knee was starting to bother me.
On the other side of my body, my right foot was going to sleep about 45 minutes into a 60-minute ride. By the way, if you ended up on this post because you were looking for a Peloton knee pain chart, you’re in luck.

Why get a remote Peloton bike fitting
This page may contain affiliate links, which means I may be compensated if you click a link. However, there is no cost to you. Also, as an Amazon Associate, I earn from qualifying purchases. For more info, please see my Privacy and Disclosure page.
Even with getting out of the saddle to get blood back into my legs, my big toe always ended up asleep. Plus, whenever I did longer rides, I always ended up with a sore lower back. In addition, the heels of my hands were sore a lot.
When I first got my Peloton, I’d watched Christine D’Ercole’s bike fit video on her instructor Facebook page. That helped me get a sense of what setting I should have my seat on.
I’d searched online for a Peloton bike seat height chart. I was hoping that, at five foot, four, someone could tell me where I should have my bike seat and handlebars set.
But I soon learned that finding a good fit on your Peloton was about more than your height. There are inseams to consider (your leg length), how long or short your torso is, etc.
Here is my blog post on Peloton for short riders.
If you really want to learn how to properly sit on a Peloton bike, this remote bike fitting recommendation is worth it. You’ll get guidance from real pros that maybe you might have gotten while doing a spin class in person or riding indoor stationary bikes at your gym.
However, with our Peloton bikes at home, we simply don’t have the feedback from an instructor. Also, it’s not like it’s easy to put your Peloton bike in the back of your car, and take it to your local bike store for a professional bike fit.
But with a virtual bike fit, the professionals come to you. Here’s my experience using this service.
Thanks to Team Wilpers on Instagram for sharing my blog post!
Matt Wilpers remote Peloton bike fitting
I signed up for Peloton instructor Matt Wilpers’ company Team Wilpers for my virtual bike fit appointment. His training company had been offering them for a few years now.
But it made perfect sense since he is already coaching people on the side for their running and cycling skills. Making sure you’re riding your bike–be it Peloton or outdoor–correctly is key to training smart, as Matt likes to say.
Let me walk you through my experience of signing up for my appointment, what the appointment itself was like and how I’m feeling riding after the appointment.
Who is Matt Wilpers
In case you didn’t know, Wilpers is a former Division One college runner. Post college he took up cycling. Since then he’s competed in a number of road races–on foot and on the bike. This includes the New York City marathon more than once.
Wilpers is the lead power zone training instructor at Peloton. He also teaches running classes on the Tread and, starting in late 2022, rowing classes on the Peloton Row.
He joined Peloton in 2016, just months before we got our bike. At home he wasn’t my go-to instructor for classes. That all changed in February 2019.
Riding live with Matt Wilpers
It was in February 2019 that I was in New York City and had the chance to ride live in the studio for one of his classes. It was a 60-minute rock ride.
Boy, was it loud, but it was fun. In fact, at one point, there was a kind of long instrumental intro for a song. Matt asked if anyone in the studio knew what song it was. I did and raised my hand.
“Heart ‘Crazy on You'” I shouted over the music.
“Very good,” he replied! Made my day.
Also, during that class he talked about power zone training and the challenges that the Power Zone Pack people were constantly participating in. I wanted in and signed up for the next challenge as soon as I got home.
Introduction to power zone challenges
I was fortunate enough to be able to ride with Matt again about six months later. By that time I’d completed two or three power zone challenges.I could tell how much my fitness had improved.
Before we took our picture together in the Peloton lobby–a tradition in the old Peloton studio space–I shared this progress with him, and he was thrilled for me.
Signing up for a remote Peloton bike fitting
But enough about my history with Matt Wilpers. Let’s get back to signing up for a remote bike fitting for your Peloton on the Team Wilpers site.
His virtual bike fitting sessions are 45-minutes long. The page doesn’t specifically say that these bike fittings are exclusive to Peloton. In fact, there is a picture of Matt on a “regular” bike inside. That bike is on rollers or trainers.
Scheduling a remote bike fitting
Basically, you have to give all of your information and your credit card upfront. That is, your $149.99 charge has to go through.
Once your payment is confirmed, you get to the page when you can schedule your actual virtual appointment. I’d read on the Power Zone Pack Facebook page that people were waiting months for an opening.
I hoped I wouldn’t have to wait that long. Anyway, I completed the registration form and completed my check out.
Choosing your bike fitter; choose no preference
From there I could choose a specific person for my bike fitting or I could choose no preference. There were 17 names to choose from.
Some of them were familiar given the discussion threads I’d read on the Power Zone Pack Facebook page. However, I had a sense that if I choose no preference, my chances of getting my remote Peloton bike fitting sooner would be better.
And I was right. I registered for my remote bike fit on the 9th. Mine was scheduled for the 15th of the same month–or just six days later.
So, if you’re interested in getting a remote bike fit for your Peloton, the best piece of advice I can offer for you is this: choose no preference unless you want to wait four to six months.
Confirming my remote Peloton bike fitting
The Team Wilpers website was really great in communicating with me about my upcoming appointment. For starters, they sent a calendar invite and confirmation email that explained what to expect.
This included a note that, though the virtual bike fittings are booked as being 45 minutes, they ask that you give them one hour of your time, in case things run long.
Here’s a portion of what it said:
Your bike fitter will need to see you both on and off your bike from head to toe.
On the bike, they will need to see you from the side.
Off the bike, they will need to see you standing up as well as laying down.
Please try to identify the right locations to place your phone or computer prior to your fitting.
Make sure you have the tool required to adjust the cleats on the bottom of your cycling shoes.
Please reduce the tension in your pedals prior to the appointment so that you can easily clip in and clip out of your pedals.
We typically use the number you submitted to call via FaceTime.
While these appointments typically take 45 minutes, please reserve an entire hour just in case we need to go over.
Two days before my fitting, I got an email reminder.
Day of the remote Peloton bike fitting
I knew that my bike fitter would be calling in at 2 p.m. So, around noon that day I did a few things to prepare.
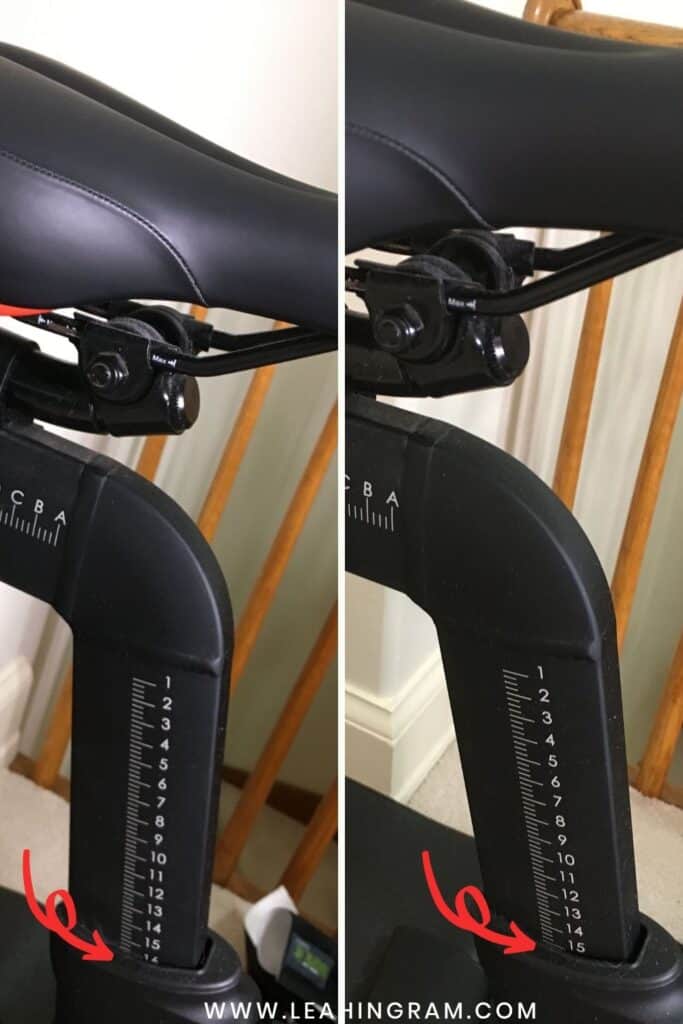
One, I took pictures of my seat settings (vertical and horizontal) as well as my handlebar settings. I wanted to have something to compare to after the fitting, assuming they would be adjusting them.
Two, I got a phone tripod and figured out how I could set it up for the fitting. I needed to find out where to put my phone for the standing up and lying down part as well as when I’m on the bike.
Three, I located my hex wrench or Allen wrench to work on my shoe cleats. FYI, if you’ve ever built furniture from IKEA, then you’ve used a hex or Allen wrench.
Finally, I made a list of the issues I’d been having so I could discuss with the fitter.
Remote Peloton bike fitting by FaceTime
From the instructions I knew that the fitter would be calling in via FaceTime.
Remember: they need to see you on and off the bike. I’m guessing that Zoom or Skype or even Google Meet would work.
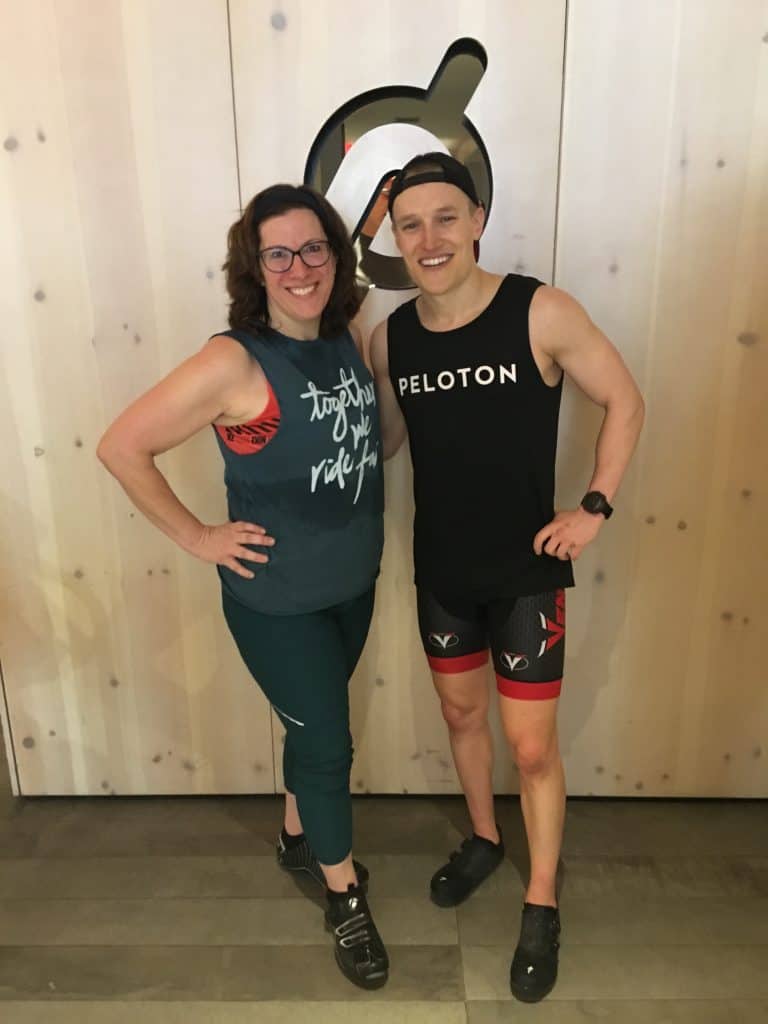
Bike fitter Brian Hammond
I ended up working with Brian Hammond. No one I’d talked to has actually worked with Matt Wilpers for their bike fitting.
My guess is that Matt has put together a group of fitness professionals who know a thing or two about bike fit. Then, he refers work to them.
I didn’t get the chance to ask Brian this specifically, but he did reference riding with Matt outdoors in real life. So, I know he knows them.
Behind Brian on the wall, I could read “TruFit Solutions.”
Thanks to Google (after the call), I discovered that TruFit Solutions is a New York City-based company that offers fitness coaching services, including bike fitting.
On the About page I found out more about Brian. He’s got a pretty impressive fitness track record.
Some of his certifications include:
- USA Cycling Coach
- USA Triathlon Coach
- Ironman University Coach
- F.I.S.T Bike Fitting
- Precision Nutrition
According to his bio, Brian has competed in the Ironman as well. Seven times. Whoa, that’s impressive.
But here’s the part about his bio I liked the most:
“At the end of the day, I am a husband, father, small business owner, and an endurance athlete. I am not a “runner,” “triathlete,” or a “cyclist.” Yes I run, yes I do triathlons, yes I ride all types of bikes but to say I am anyone of those things is wrong. It’s not how I would define myself.”
BRIAN HAMMOND
The evaluation portion of the remote Peloton bike fitting
Brian had me run through a series of exercises off the bike as part of his evaluation. It reminded me a lot of one of my evaluations with a new physical therapist.
I remember when I had chronic lower back pain, my PT wanted to see what my hip strength was like. Brian was doing the same.
He had me do one-legged squats, forearm planks, a sit and reach (to determine my hamstring flexibility) and side planks on each side, with a leg lift thrown in for good measure.
On this last set of exercises, I was a rock star on my right side. I went right up into a side plank and lifted my top leg, no problem.
Then, I rolled on to my left side. It was a completely different story. I pushed up into the left side plank without much effort.
But, then Brian asked me to raise my top leg, my right leg. I could barely lift it up.
He had me go back down onto the floor and try again. So I did. This time, I completely collapsed.
Off the bike diagnosis
Considering that I’d been complaining about left hip pain, it was no surprise that Brian diagnosed me as having a weak left hip. He confirmed that we would address this when discussing my proper form on the Peloton bike.
It was his diagnosis that my feet were gripping in my shoes and/or not strong enough so I needed to work them out, too. Again, he would recommend tools for those foot exercises.
When he mentioned the gripping, all I could think of was Denis Morton admonishing riders during class not to curl our toes in our shoes and grip like an eagle on a branch. Who knew that so many of us did this?
Adjusting the cleats on my cycling shoes
Next, Brian wanted to see the cleats on the bottom of my cycling shoes. So, I held them up to the camera for his evaluation. Almost immediately he had a solution.
“Loosen them with the wrench,” he said, “and then slide them so they’re all the way up and in towards your big toe.”
In other words, make sure that the cleats were sitting as close to the front of the shoes as possible. At the same time move them so they are all the way close to the inside of each foot.
Previously, I’d had the cleats centered on my shoe bottoms. In fact, he complimented me on how straight my cleats were. Thanks, Brian!
Getting on the bike for my fitting
Brian was ready to see me on the bike. But, first, Brian wanted to see where my settings were.
So I brought the camera closer so he could see that my seat was at position 14 for height and the fore/after or horizontal position was what I called “D and a half.” Basically, between D and E.
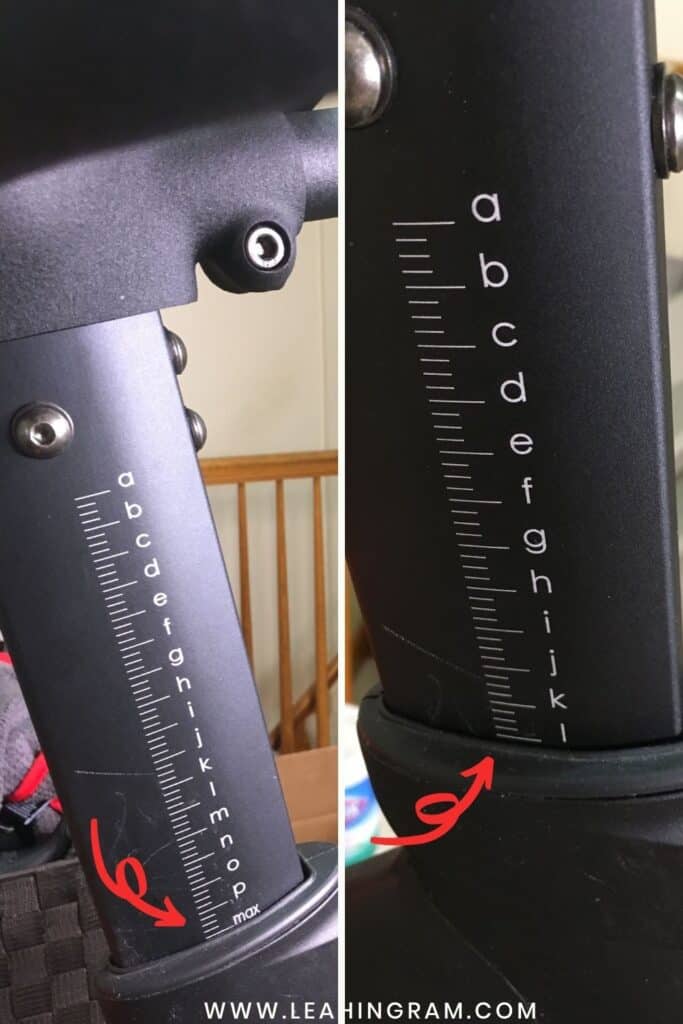
Next, I showed him the handlebar setting. They were at max.
To be honest because my husband is 6′ 3″, we’ve kept the handlebars that high. Plus, I have trouble moving them up and down.
Brian said he hears this a lot–about the Peloton handlebars being hard to move. He promised he would share a secret with me to make that easier.
Finally, it was time to get on the bike. I set the camera back in the position I’d pre-planned for showing him what I looked like on the bike.
I clipped in and started pedaling. Brian watched for a few minutes. Then, he asked me to dismount and adjust my settings.
Adjusting my seat settings
First, he had me bring my seat up to 15. So, not much of a change there.
Second, he asked what I thought about moving my seat back to E. I told him that I’d tried this in the past and that my fingertips could barely touch the handlebars.
So, we left that setting as is.
Changing the handlebar height
After that, he wanted me to bring the handlebars way down. He said five settings, which would take them from Max to setting L.
Then, he shared the trick for making it easier to move Peloton handlebars.
One, loosen the crank arm between the water bottle holders. Two, put one hand under the rounded part in the middle of the handlebars. Think about it like picking up a suitcase handle.
At the same time, use your other hand to gently pull the handlebars towards the seat. With both the “forces” the handlebar slid smoothly down. No tugging required.
I got it to position L and tightened the crank arm. Then I got back on the bike.
Here is my article that answers common questions about the Peloton handlebars.
Pedaling with my new bike settings
It felt really weird being on the bike and in such a forward position. But Brian said that this was actually better for me because it had my pelvis in an optimum position.
Turns out that in a more upright setting, my pelvis was tipping backwards and my lower back was curving under. That was likely the cause of my low back pain.
As far as pedaling, Brian said that I needed to work on keeping my heel down when pedaling. That is, I was tending to point my toes down too much.
When you point your toes down, you’re not engaging my hamstrings and glutes. Instead, I should think about pushing my heels backwards when I pedal.
Again, a tip I’ve often heard instructors say about getting your heels back in your shoes. Now, I understood what they meant.
Finally feeling my sit bones
In this new, more forwards position, I had an easier time actually feeling my sitz bones on the saddle. You may recall hearing instructors talk about securing your sitz bones or nailing your tail to the seat.
I just always assumed that I had too much fat on my backside to feel my sit bones. Now, I really felt them. It made a huge difference.
Moving my hands around while riding
Brian gave me suggestions on how to put my hands on the handlebars to avoid having the heel or pads under my thumbs get sore. He talked about moving my hands around while riding. Again, this is something I’ve heard so many instructors say.
Also, with the new lower position, I could actually reach farther forward on the handlebars, which gave me additional options.I did tell him that I thought a flaw in the Peloton bike was that you couldn’t move the handlebars forward and back, only up and down.
He said something to the effect that every bike fitter working with Peloton clients these days agrees with me 100%.
My ride experience after my remote bike fitting
So what was it like riding my Peloton after my bike fitting? Well, the first class was rough. Really rough.
Granted, it was a Matt Wilpers 60-minute Power Zone ride, and I did it on an empty stomach. But pedaling felt harder and my forearms and triceps ached from the new handlebar position.
The next ride was no better. So, I emailed Brian to ask if I could move the handlebars up. Of course, he said.
I decided to move them up just one letter–from L to M. Then, I took the FTP test.
Why? First, it was the end of the eight-week Power Zone Challenge and taking your FTP is always an option.
Second, with pedaling feeling harder, I wondered if I needed to ratchet back my zones until my body got used to the new bike fitting.
So the result? Well, the handlebars at M were perfect. Absolutely perfect.
No arm aching, I felt secure on the bike and my pedaling even felt easier.
Oh and the FTP? I went up three points.
How do I feel after my professional Peloton fitting
While those first few rides were not easy, overall my body feels so much better. Literally, my left hip is no longer hurting.
However, you know what is sore? My glutes and hamstrings.
It reminds me of, back in the day, when I started doing step classes. Not surprisingly step classes work the heck out of your glutes and hamstrings.
I can remember having trouble going up and down stairs afterwards. Well, these days I’m feeling very sore in my glutes and hamstrings.
Which tells me two things.
One, I’m using my glutes and hamstrings on my Peloton in a way I never did before. And, two, I need to stretch more.
Want to get a virtual bike fit from Team Wilpers? You can save 5% with my unique code: BFR-24821-TY.
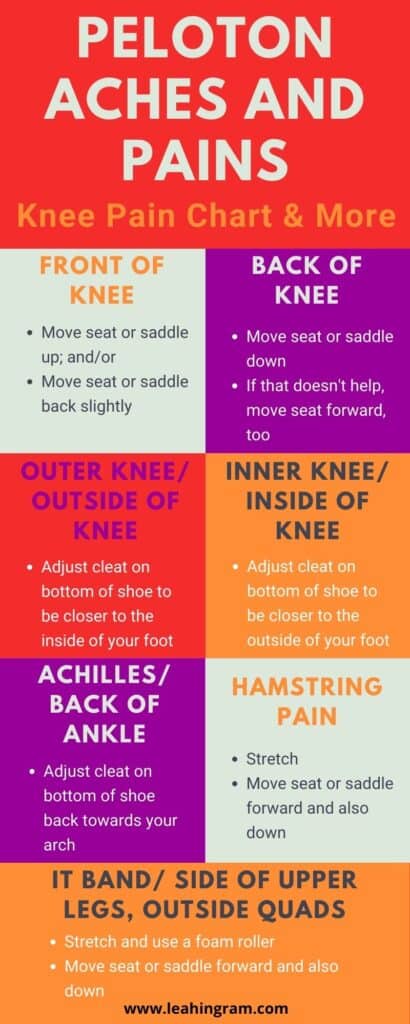
Peloton Aches and Pains Chart
As promised here is a chart that might help you figure out why you’re having knee pain on your Peloton.
Keep in mind I am not a medical professional. This chart and these recommendations are for informational purposes only. If you are concerned about your knee pain, please see a doctor.
Optimal fit is great, but the unadjustable crank arm length of 175mm on the Peloton is only suitable for taller riders. It is not changeable as Peloton decided to weld it to the drive wheel. Too long of a crank arm is the main culprit for knee pain.
Hi, thanks for the blog post on this and short riders. I saw the handlebar grip and where you mentioned it was sold out. It looks like they moved their storefront off amazon (https://getaerow.com/products/comfortgrip?sca_ref=1226741.X0CM81ZEQr). I’m going to try this solution, since my gap is about an inch, then try the adjuster if not.
Thanks for the tip about the new storefront.
Leah
Please take a look at our site and services as well.
Let me know what you think?
Thanks,
Thanks for letting readers know about your service, too.
Leah