
Peloton Bike Calibration: How to Calibrate a Peloton Cycle
I’ve just updated this article to include a video I made showing how I calibrated my original Peloton bike, which we bought in 2016. In 2020 we added a second bike, the Bike Plus, which auto calibrates. However, if you are still using an OG Peloton Bike, you might find this information helpful.
I never thought about the notion of the Peloton bike calibration until we moved in 2018. The first time I got back on my cycle after the movers left, everything felt wrong. My bike was never easy to ride, to be sure. However, now I was sure there was a calibration problem.
You see, the resistance levels all felt off. For example, pedaling at 40 resistance felt like what riding at 70 resistance felt like before we moved. I lived with these new resistance levels for a few weeks. Soon enough, though, riding just wasn’t fun anymore.
My knees were hurting from pushing through cadences and resistances that felt impossible. So I asked in some of the Peloton Facebook groups what I should do. They told me to re-calibrate my Peloton

Fixing a Peloton bike calibration problem
This page may contain affiliate links, which means I may be compensated if you click a link. However, there is no cost to you. Also, as an Amazon Associate, I earn from qualifying purchases. For more info, please see my Privacy and Disclosure page.
To re-calibrate a Peloton, first you need bike calibration tools. How do you get these tools? You can order them from Peloton. (Link at the bottom of this post).
I guess it used to be that when you ordered a Peloton–we got ours in 2016–they sent you the tools automatically. Because when I asked my husband if he knew anything about calibrating a Peloton, he reminded me of the white plastic “discs” that came with our bike.
Aha, the elusive calibration tools. Now what to do with them.
Finding a Peloton bike calibration video
Next, I needed to figure out how to use these tools. At that time there was a video on the Peloton support site that walked you through recalibrating.
It’s gone now. So I made my own. Here it is. (If the video doesn’t load, use this link to watch on YouTube.)
Effect of recalibration on my FTP
After finally recalibrating, the Peloton bike was definitely much easier to ride. In fact, because I’d been doing Power Zone Training, I knew I needed to retest for my FTP.
Well, my old FTP (when the bike was harder) was 164. I took that FTP test on January 13, 2018.
Peloton FTP retest output
When I retested my FTP on March 15, 2019, it jumped to 243. According to the mPaceline app, my FTP increased by 48%.
In retrospect, that’s just ridiculous. Sure, I’d been riding more regularly and was probably fitter. But 48 percent fitter?
Since then I’ve retested five times. The last time my FTP went up to 279. That’s a 70% increase since my first FTP test.
Here is my blog post all about the Peloton FTP test.
My Power Zones seemed out of whack
During a recent Power Zone ride from this year, Matt Wilpers shared what his zones were. If you know about Power Zone training, then you know that your FTP “score” is basically the top of your zone 4.
When I learned that my zone 4 was higher than Matt Wilpers–a former Division One athlete, marathon runner and all-around super fit person–I knew I needed to recalibrate my bike again. It was too easy
Why I recalibrated my Peloton bike
There was another reason to recalibrate my bike this year. It was getting to the point where I had to ride at resistance levels 15 to 20 points higher than what instructors were calling out.
At the same time, it was nearly impossible to pedal slower than 75 cadence, regardless of resistance. Anything lower literally felt like spinning my wheels. Also, any resistance level lower than 35 also felt like my wheels were spinning.
My fitness wasn’t improving either
In addition, I found that my fitness wasn’t improving anymore. I used to get off the bike feeling like I’d gotten a really great workout. Now, not so much–even if I’d ridden for 60 minutes.
I mean, I know that one of instructor Denis Morton’s quotes is, “It’s not that this gets easier, it’s that you get stronger” (or something like that). But things were feeling too easy and I didn’t feel like I was getting stronger.
The Bike Plus pushed me to recalibrate
The final push I needed to recalibrate our original bike? We bought a Bike Plus.
As you know from my blog post that chronicled my bike delivery experience, we recently purchased a second Peloton bike. This time around we got the Bike Plus.
After doing a few rides on the Bike Plus, I knew that it just didn’t match the feeling of riding the original bike. Again, that original bike was way too easy to ride.
I mean, look at this image below for a 60-minute Christine D’Ercole Climb Ride I did on the Bike Plus. I barely got out of Zone 1, and I was working harder than I expected.

Peloton resistance levels and calibration
Before I decided to recalibrate my original cycle, I did an experiment. I took video of the screen as I was pedaling on the Bike Plus at different resistance levels and cadence. I wanted to record the output levels so I could compare them to the original bike.
Then, I did the same experiment with the original bike–pre-recalibrating. I set the bike at different resistance levels and pedaled at different speeds. I videoed the screen, too. Then, I compared outputs.
It’s not output that affects calibration
Here was my mind-blowing moment. I always thought that a bike that wasn’t calibrated properly would give you a jacked output.
I mean, I know of plenty of people who calibrate their Peloton bike so they can get a higher output. They do this so they can be on the top of the leaderboard.
No, it’s not the resistance as compared to cadence and the resulting output that matters. It’s how it feels when you’re pedaling at 80 cadence and 40 resistance. That’s what matters.
Combination of cadence and resistance
For example, before I recalibrated my original bike, I could warm up in a Power Zone ride at 80 cadence at 40 resistance, and it was barely anything.
However, when I took a Power Zone ride on the Bike Plus, at 80 cadence I could barely pedal above 25 or 30 resistance for a warm up.
You may be looking for some kind of chart or guide that will tell you your calibration is off. Here’s what I can tell you: regardless of calibration, your bike will hit certain outputs when you’re at different cadence and resistance levels.
However, even a bike with calibration problems will likely have a similar output. Again, what’s going to be different is how hard or easy the bike feels to ride.
Here are some additional Peloton bike troubleshooting issues to read up on.
How to calibrate a Peloton cycle
I’m going to walk you through the step by step instructions of how to calibrate a Peloton cycle. This is based on the steps I just took with my original bike.
The whole process should take 15 to 20 minutes.
Instructions for Peloton calibration with the original bike
If you want to calibrate your original Peloton bike, here are instructions, steps or a guide to follow to do that.
Calibration instructions on the screen
- To get to the calibration screen, go to the home screen on your bike.
- Look for the three dots on the bottom right, and tap them.
- A new menu comes up; look for About.
- Tap About.
- A screen within the screen will appear with details about your bike’s hardware.
- Tap the top corner of that smaller screen multiple times until the Sensor Calibration screen appears.
- Tap “Get Started.”
- A screen will appear telling you to “Turn the resistance know all the way to the left, then press calibrate.”
- Turn the knob as instructed, then tap the red “calibrate” button on the screen.
- The next screen tells you that minimum calibration has been achieved.
- Tap red button on screen that says “Calibrate maximum resistance.”
- Follow instructions on next screen to turn the resistance knob or brake all the way to the right until it won’t turn anymore.
- Tap the red button that says “Calibrate.”
- Screen changes to say “Maximum resistance calibrated.”
- Tap red button that says, “Done.”
- Next screen is about calibrated the output curve and instructs you to turn the resistance knob all the way to the left again.
Calibration instructions with the tools
First, take the plastic “wedge” calibration tool on the flywheel between the second and third magnets. You may have to remove the water bottle holder to get the wedge in there.
Next, you’ll be turning the resistance knob until the wedge is secure between the magnets but you can still take it out. This may take some turning back and forth, kind of like a Goldilocks approach.
That is, you’ll be turning the resistance knob or brake so that the wedge isn’t too loose or too tight between the magnets but just right.
Once you’ve achieved the “just right” status, you’ll take the wedge off the flywheel. Leave the resistance knob exactly where it was.
Put the calibration tools aside for now
Here is where my instructions differ from Peloton’s. Their instructions suggest you use the second set of calibration tools, which are two C-shaped discs.
You’re supposed to put them under the resistance knob or brake to help with turning to calibrate. Honestly, the discs kept slipping out on me and I didn’t understand their purpose.
So here’s how I calibrated the bike without using the calibration tools.
Final calibration procedure
From here you’ll go back to the calibration screen to finish the procedure. It tells you that you will be turning the resistance knob 31 times, a 1/4 turn each time, until the bike is fully calibrated.
Rather than use the discs, I used the “P” of the Peloton for each of the 1/4 turns. It’s imperfect, I know, but at least it gives you an easier visual to work with than the discs. Or at least that’s my opinion.
Calibration screen
Anyway, back to the calibration screen. Tap the red button that says Next, and start turning.
The screen will show you 31 clear dots. First, you’ll turn the knob a quarter turn.
Next, you’ll tap the red button “Set.” Then, the first clear dot will turn red.
After that, turn the knob again a quarter turn, tape the red button “Set” and the second dot will turn red. Follow this procedure all the way until all the dots are red.
After the final tap of the “Set” button, you’ll get a confirmation screen that says “Calibration Complete.”
Resetting your bike
The final part of calibrating a Peloton bike is resetting the bike itself. You’ll do this by clearing its data and cache.
Here are the steps you need to take to get to where you can clear the cache and data. Don’t worry–you won’t wipe out your workout history.
- Return to the Peloton home screen.
- Tap the three dots on the bottom of the screen.
- Go to device settings.
- Look for apps and tap “Apps” to open.
- Scroll until you get to the app that just says “Peloton.” Tap on that to open.
- Look for storage and tap to open.
- You’ll see “Clear Data” and “Clear Cache.” Tap both to clear or wipe the cache and data.
- You’ll likely get a warning message. Tap “Ok.” You will not lose your ride data.
- After data and cache are cleared, shut down your bike.
- When bike is shut down, unplug from the back of the bike, count to 30 seconds, plug bike back in and restart.
One more reset after calibration
In addition to resetting your bike as described above, there is one more thing you should reset. And that would be your personal records.
Because when you change your bike’s calibration, it’s going to affect your PRs. That is, they’ll either be easier to achieve or beat, or they’re going to feel impossible. Therefore, you should reset them, too.
Test your new Peloton resistance levels after bike calibration
Now that you’ve recalibrated your Peloton bike, you should test out your new resistance levels. Make sure the bike feels “better” to you.
Better could be much easier, if it was riding too hard. On the other hand, better could feel more normal if, like mine, it felt too easy.
I will say that in recalibrating my bike to feel more like my new Bike Plus, I may have made my original bike harder. I mean, after retaking my FTP test, my FTP came out as 106.
Remember, it was 164 before I moved and my bike seemed to get out of whack. Then I recalibrated it to be, in retrospect, too easy. My FTP was 279.
According to mPaceline, from 279 to 106, my FTP went down 35 percent. But you know what? I’m OK with that. Because this feels like a more honest reflection of my fitness.
Update: I’ve since retested and my FTP is up to 111. So, the bike still rides “hard” but I am getting stronger.
My Power Zones before bike calibration
Previously, before recalibrating my original Peloton Bike, here was where my Power Zones landed (note, they start with Zone 2):
Two: 155
Three: 210
Four: 252
Five: 294
Six: 336
Seven: 420
My Power Zones after calibrating my Peloton bike
After recalibrating my bike, here’s where my Power Zones landed (again, starting with Zone 2):
Two: 60
Three: 81
Four: 97
Five: 113
Six: 129
Seven: 161
And these new zones are hard. I have to admit that my ego is having a hard time with these new zones, because they are so low.
But I have to remember what Peloton instructor Christine D’Ercole says on nearly every ride. Paraphrased: it’s not where you are on the leaderboard but the fact that you’re on the leaderboard that matters.
Comparing an old ride to a new ride
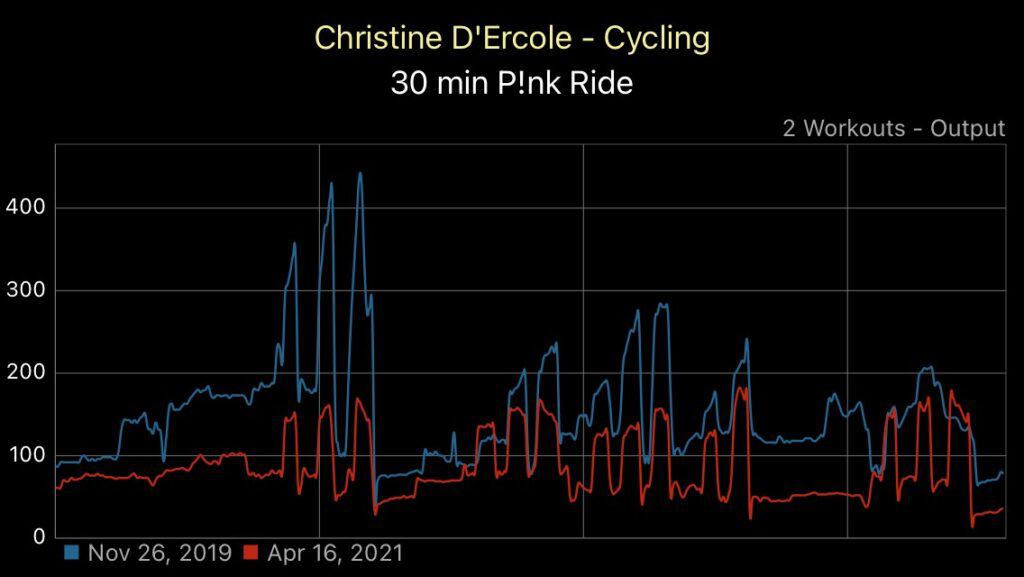
I figured one of the best ways to compare my Peloton bike calibration outputs would be to take a ride that I’d taken before. So, recently I did Christine D’Ercole’s P!nk ride.
By the way, if you haven’t done this one yet, definitely put it on your to-ride list before the next purge.
I remember how that P!nk ride was more of an interval ride than just a fun themed ride. And boy with my new zones, could I feel it.
Before my Peloton bike calibration, or recalibration, my total output on the P!nk ride was a 261. After my Peloton bike recalibration, my total output was a 144.
You can see from the spikes in the chart how I was able to achieve a much higher output on the pushes. That’s because it was much easier for me to ride at higher cadences and resistances.
Common questions about Peloton bike calibration
I’m sure I’m not the only one who has had questions about calibrating a Peloton bike. So, here are some common questions about Peloton bike calibration that, hopefully, this blog post has answered.
Do Peloton bikes need to be calibrated?
According to Peloton all bikes should arrive at your home properly calibrated. But, as I think my story shows, if you move a Peloton, you may find the calibration gets out of whack. This could be because the flywheel got knocked or something else.
With regards to the Bike Plus, they are auto calibrated. So no calibration tools needed.
In fact, when our Peloton Bike Plus was delivered, the person who brought it in the house then walked me through how to calibrate the bike from the touch screen. Since the Bike Plus has the auto follow for resistance on the screen, there’s no need to use a Peloton calibration tool to fix it. I like that.
When should I calibrate my Peloton bike?
I think that if you find your bike has become impossible to ride, like I did after our 2018 move, then you should recalibrate the bike. Additionally, if you think your bike has become too easy and you’re no longer getting the same benefits from it, you should recalibrate.
Of course, if your goal is to calibrate your Peloton bikes so you can game a higher output and beat everyone on the leaderboard, well, that’s on you. Me, when I consistently found myself in the top 10 percent of riders, I knew something was off.
I may have been riding for nearly five years, but I know I’m not as fit as someone like Matt Wilpers.
How do you recalibrate the Peloton Bike Plus?
Since the Peloton Bike Plus has auto-follow for resistance, calibrating it is much easier than with the original Bike. Basically, you go into the settings menu, you find the area that covers calibration, and you tap the screen. The bike does the rest.
How do you tune up a Peloton bike?
Calibration does not have to be part of regularly tuning up your Peloton bike. But others things are, such as tightening your pedals or keeping your bike clean.
This blog post on Peloton bike maintenance should answer your tune up questions.
Final thoughts on Peloton bike calibration
As I’ve mentioned a couple of times, when it comes to calibrating a Peloton bike, output shouldn’t matter. What should matter is how your bike feels to ride.
Making your bike calibration so it’s much easier to ride so you top the leaderboard only helps your ego, not your fitness. What are you proving if you can ride 100 cadence at 100 resistance? That you are most macho?
On the other hand if jacking your bike so you’re number one on the leaderboard is what gives you the motivation to ride to ride every day? Well, quoting the Peloton instructors, “You do you.”
I’m really scared to wipe data – are you sure it doesn’t wipe it all? Nothing happened after I recalibrated without wiping data. Do I now need to do the recalibration all over again? Thanks!
Probably.
Thank you for this! I found this thread after trying to figure out something odd that I noticed when riding. I saw a guy just flying up the leaderboard at an improbable pace. When I looked at his output, his cadence and resistance were significantly lower than mine, yet his output was 30-40 watts higher. It really made me question the reliability of the power meter. I’m closing in on 1000 PZ rides and I feel a bit better knowing that these bikes aren’t apples to apples!
I’m glad you found it helpful.
Leah
Hi there I tried to recalibrate and now my resistance know is spinning very easily and doesn’t offer any resistance. The monitor shows the resistance when I petal, but it goes from 0 to 100 with no effort at all.
Any suggestions?
You need to do it again. As I mentioned when writing about my experience, it took three calibration attempts to get it right.
Wow, this was super helpful. I’ve found it nearly impossible to find the videos on how to calibrate the original bike (mine is also from 2016). I moved my bike over a year ago and I have also ignored the harder pedaling (I do PZ rides, too) but I find the rides harder and harder to do. Figure It’s a good time to re-calibrate before the next challenge. Thanks so much for this post
I’m glad you found it so helpful!
Your situation is very similar to mine. I’ve calibrated 5 times and still don’t see the numbers in the ranges you posted in all resistances. I’m wondering if when you turn the knob all the way to the right if you take it all the way to where it stopes or if you stop when it would require using strength to turn.
Excuse spelling errors on board kinda clunky
This is really helpful, thanks! I finally bought my own Peloton after using the ones at my gym and office for a year, and was distraught when I couldn’t get my output within 60 of my typical benchmark for my first 6 rides on my own bike.
Do you know what you did during the process to make the bike “easier” or “harder”? I followed the guide, but the resistance still feels too high, comparatively. I had 3 different bikes at my disposal before, all of which put my output consistently in my “benchmark” zone, so I am chalking it up to the calibration on the one I bought myself.
It’s all about where the resistance knob is when you start the 31 turns. If you have it all the way to the left, your bike will be too easy. That’s why you’re supposed to put the calibration wedge on the wheel and then turn the knob until you can just barely take it out. Then you leave the knob where it is and start the 31 turns series. If you want to game your bike to be super easy so you’ll be at the top of the leaderboard, then don’t use the wedge at all.
Thanks for your complete calibration experience. I have a Peloton bike at home that pretty much matches the resistance-cadence-outputs in the charts. My wife and I both ride. I mostly do PowerZone classes. My FTP is much higher than Matt’s. As he says, it’s about FTP/Kg body weight not just FTP. I am much bigger than Matt so based on FTP/Kg he will certainly win. I tried my daughter’s Peloton for the first time today and found that it was incorrectly calibrated — shows too low an output for the resistance-cadence combinations. But she doesn’t do PowerZone or care about the leaderboard, so it doesn’t matter to her. She uses HRT to judge difficulty. I just did a ride based on HRT since I couldn’t use output measures. Next time I visit I will try the calibration procedure.
Thanks so much for posting your comment!
Leah
Just found this and she comprehensive. Not sure if you still respond but wanted to get your take on this, I may have missed the answer. Measuring against the chart, I on the mark at the lower cadence’s /resistance but as I climb up the chart it becomes way off at 45+ and then big delta at 50+ . Thoughts on it being on mark at lower cadence resistance and missing by 20 /30 points up the ladder?